Course VM Instructions
Overview
The course includes 9 programming labs (Lab 1 thru Lab 9). The instructions for each lab are provided at the end of the corresponding module on Canvas, you may also look for them directly on this website.
In each lab, you will implement or apply a software analysis technique that is taught in the lectures, mostly using C++. If you are new to C++, read the article A Whirlwind Tour of C++ and complete the warm-up exercise. The aim of each of the labs is to reinforce concepts learned in the lectures while also preparing you to develop and tailor software analyses for a broad range of use-cases in the real world. To realize these goals, the labs target analyzing programs in C, a programming language for which extensive tooling and documentation is available for building realistic software analyses. In particular, the labs are built atop the LLVM Compiler Framework. This framework has become the de-facto standard for compiling programs in a variety of programming languages including: C, C++, Objective C, Julia, Rust, Scala, Swift, and others. It is widely used in industry including at Apple, Facebook, Google, and Microsoft.
The duration of each lab is a week or two. It is impractical to implement a standalone software analysis for the entire C language in that duration. To allow you to focus on essential concepts, we have provided a containerized virtual machine (VM) based on Ubuntu 18.04 pre-loaded with tools and libraries required to conduct the labs. Lab instructions assume you are using the course VM and it has been set up following this document. Your completed labs will be graded in an environment identical to the course VM to ensure that your work runs as expected.
This document will first guide you through setting up the course git repository and how to apply updates to the labs when necessary. Then you will set up the development environment for course labs using docker, VS Code and devcontainer. Finally we cover some of the tools available in the development environment, how to install more, and some FAQs.
Course Lab Management
Getting Started.
The labs for this course are delivered through the course’s Github repository. So you will need to install git on your machine. You can find the instructions here. Once you have installed git, you should clone the course repository from GitHub with:
$ git clone https://github.com/cis547/cis547vm.git
This will create a cis547vm directory with the course files.
In particular, you can see the structure of the labs with ls:
./cis547vm$ ls
lab1  lab2  lab3  lab4  lab5  lab6  lab7  lab8   lab9   sandbox
Some of the above may not be available initially, but will be added as the course progresses.
Note: All git commands are to be run from inside this
cis547vm folder on your local machine.
Pulling Changes and Fixes.
Using a git repository allows changes and hot-fixes to assignments to be made
on the fly by the course team.
In order to grab these changes, we may ask you to run a git pull in order to get some of the latest lab content.
./cis547vm$ git remote -v
origin    https://github.com/cis547/cis547vm.git (fetch)
origin    https://github.com/cis547/cis547vm.git (push)
./cis547vm$ git pull
remote: Enumerating objects: 98, done.
...
Saving Your Work.
To prevent work from being lost, it is recommended to backup your code. The recommended practice for managing source code is to use git, via services like Github that provide free, private repositories for hosting your files.
Once you import the cis547vm repository as a new private repository, you can add your new repository as a remote on your local machine.
Note: Please ensure that your personal repo is “private” NOT “public”.
Adding a Personal Git Repository.
You can run the following commands to initialize the remote repository:
./cis547vm$ git remote add personal <mypersonalrepo.git>
./cis547vm$ git remote -v
origin     https://github.com/cis547/cis547vm.git (fetch)
origin     https://github.com/cis547/cis547vm.git (push)
personal    <mypersonalrepo.git> (fetch)
personal    <mypersonalrepo.git> (push)
Pulling Changes and Fixes with Multiple Remotes.
As mentioned above, in order to grab lab content changes, we may ask you to run a git pull in order to get some of the latest lab content. If you’re using multiple remotes, you can run:
./cis547vm$ git pull origin master
The additional options are assumed when running git pull,
but the full syntax follows the schema: git pull <remote> <branch>.
Pushing Saved Work.
Additionally, it is helpful to commit code to your personal repository once you have things in a working state. To achieve this, you can run the following command:
./cis547vm$ git add <file>
./cis547vm$ git commit -m “Short summary of changes you made”
./cis547vm$ git push personal master
Now, instead of pushing directly to the course Github repository
where the labs are hosted (which is considered the origin remote),
you are explicitly instructing git to push to your
personal remote and the master branch.
This follows the same schema as mentioned before: git push <remote> <branch>.
Using Git to Track Changes.
Using git to track source code is a common practice and an important asset in software engineering. Throughout this course, you may find it useful to rely on git for saving one implementation of your lab assignment (through commits) while allowing you to refactor/revise your algorithm freely. You can not only revert back to previously saved commits, but also diff your current implementation vs your former in order to view your existing changes and edit any unwanted changes.
For example:
./cis547vm$ git status
On branch master
Your branch is up to date with 'origin/master'.

nothing to commit, working tree clean
./cis547vm$ vi lab1/c_programs/test5.c # modify source code
./cis547vm$ git status
On branch master
Your branch is up to date with 'origin/master'.

Changes not staged for commit:
  (use "git add <file>..." to update what will be committed)
  (use "git checkout -- <file>..." to discard changes in working directory)

    modified:   lab1/c_programs/test5.c

no changes added to commit (use "git add" and/or "git commit -a")
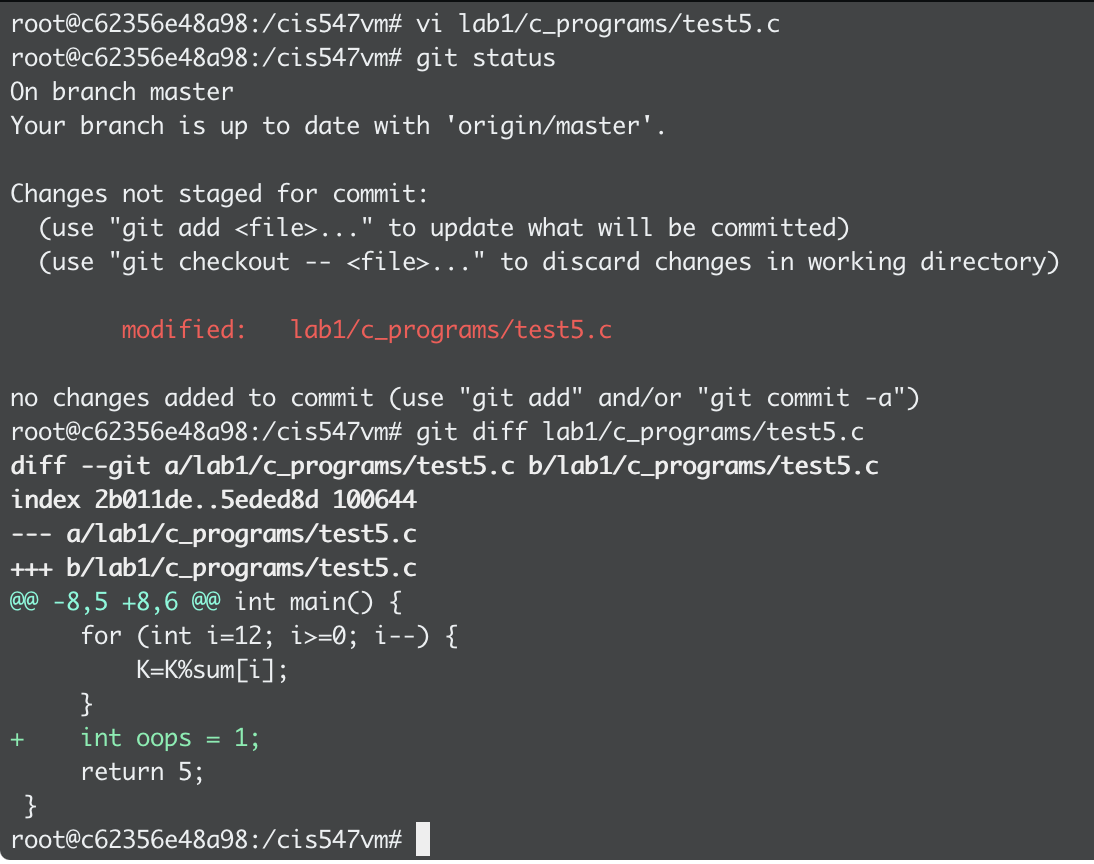
./cis547vm$ git diff lab1/c_programs/test5.c
diff --git a/lab1/c_programs/test5.c b/lab1/c_programs/test5.c
index 2b011de..5eded8d 100644
--- a/lab1/c_programs/test5.c
+++ b/lab1/c_programs/test5.c
@@ -8,5 +8,6 @@ int main() {
     for (int i=12; i>=0; i--) {
         K=K%sum[i];
     }
+    int oops = 1;
     return 5;
 }
See the screenshot for more colorful, readable output:
Setting up Course Environment
Using VS Code Dev containers for the course environment.
We will use Docker containers with VS Code to ensure everyone uses a consistent development environment for the labs throughout the semester. Before proceeding, you need to install docker on your local machine; we will refer to this machine as the host machine. After this, install VS Code and within VS Code install the Remote Development Extension.
For the course labs, we provide a configuration file in each lab that instructs VS Code how to set up a development environment using an appropriate docker image and various other configuration options.
To start working on a lab, open the lab inside VS Code. Press the F1 function key to open a search box. Search and select Reopen in Container. This will reload VS Code and set up the development environment. You can now edit, run and debug your lab in VS Code. To resume working on a lab, open the lab in VS Code and Reopen in Container. Any changes you make here will be available in your ./cis547vm folder.
Note: You will need to open the lab folder such as lab1 or lab2 in VS Code
rather than the cis547vm folder.
Course VM Environment
Completing Labs on the Docker Image.
The labs are located under ./cis547vm/ in separate folders
named lab1 thru lab9.
To work on a lab you open its corresponding folder in VS Code
and follow the above steps to reopen it in a container.
The container comes pre-loaded with the following software:
- Course software such as clang, gcc, afl, souffle … That you will learn about and use for the labs.
- Debugging tools GDB and Valgrind. GDB offers extensive facilities for tracing and altering the execution of programs. Valgrind includes runtime tools to find memory errors, profile your program’s performance, and more.
We have also provided a folder named sandbox alongside the lab folders. Use this folder to play with the LLVM API.
Installing Software on the Docker Image.
While it is generally fine to install development tools like a text editor on the course VM, do not run software updates or upgrade installed packages, as it could render a lab inoperable. If you find yourself with a botched docker container due to updates or accidental changes – or simply want an unmodified container – open the lab in VS Code and press F1, search for Rebuild Container; once rebuilt you can Reopen in Container to open the lab in a fresh container.
FAQ
How do I resolve errors with Docker Desktop not starting due to “not enough space on the disk”?
You will likely need to clean up some space on your primary hard drive
(ex: C:// on Windows) so you have at least 5GB of free space.
One way to do this is by removing the old containers from docker.
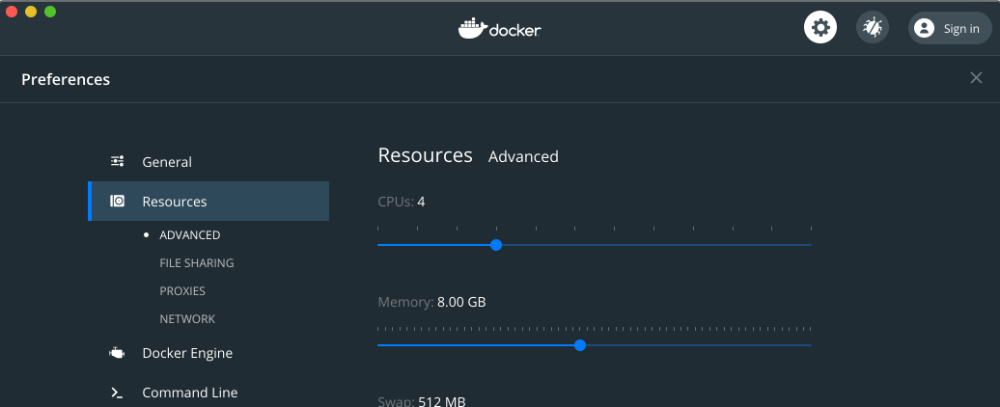
Alternatively, another workaround you can try to reduce the amount of memory
Docker Desktop consumes through its settings:
How do I install Docker Desktop when it fails due to errors like “Docker Desktop requires Windows 10 Pro/Enterprise (15063+) or Windows 10 Home (19018+)”?
Apply Windows 10 updates so that your version is greater-than-or-equal to the required build number specified in the error message.
My “docker pull” command fails due to an “input/output” error, how do I fix this?
Restart your computer and try again.
If the problem persists, restart the Docker application.
If you’re using Mac, you should see a Docker icon in the menu bar
which you can open and click “Restart”.
If you’re on Linux, you can run
sudo systemctl restart docker or sudo service docker restart.
If you’re on Windows, you can also open up the Docker Desktop applet
and restart from the GUI, or run Restart-Service docker in a Powershell terminal.
When using the course Docker container, my gdb debugging process fails to start due to some error like “warning: ptrace: Operation not permitted”.
This is likely to happen if your host operating system is Linux, and there are security settings on the host blocking this ability. Please make sure you go through the docker installation documentation and ensure you’ve completed all the steps, including adding your current user to the docker group
sudo usermod -aG docker $USER
and restart your machine.
I’m using VirtualBox for another class and Docker for this class. I find I need to restart my computer due to Docker requiring Hyper-V and VirtualBox not supporting Hyper-V. Is there a way I can run both without restarting?
More recent versions of VirtualBox do support Hyper-V virtualization, however it’s a setting that must be enabled on a per-VM basis. In VirtualBox, you should be able to open the settings of a stopped VM, navigate to System > Acceleration, and change the paravirtualization interface to Hyper-V like so:
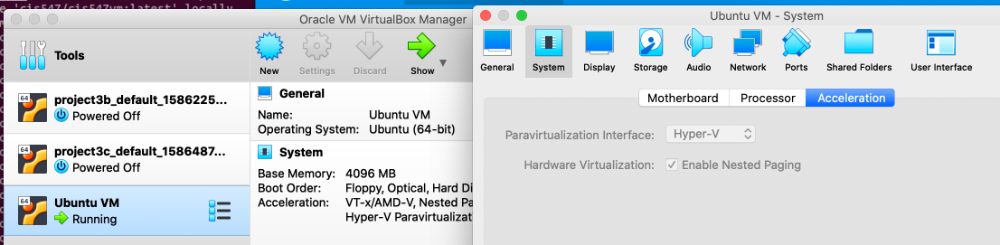
This should enable you to keep Hyper-V enabled on your host machine whilst preserving the ability to use Docker and VirtualBox VMs at the same time.
Alternatively, it’s also possible to run Docker within a Linux-based VM. You can follow installation instructions here for Ubuntu, but if you’re not using Ubuntu there are some other flavors of Linux on the left navigation panel.